Wheel DiameterMeasuring Instrument

SPIDER is an electronic device designed to measure versine values and to make subsequent calculations of wheel diameters of railway and tram vehicles.
Practical applications of the SPIDER are as follows:
• Wheel checking for operational wear (wheel diameter),
• Wheel testing before re-profiling.

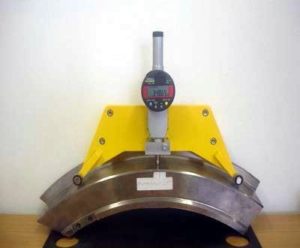
SPIDER is an electronic measuring device designed to precisely determine the wheel diameters of the railway or tram vehicles. The wheel diameter is being determined indirectly, by calculation based on the versine measured on a three-point symmetrical chord having 300 mm in length.
The rise results from a contact measurement at the distance of 70 mm (for railway vehicles), or 45 mm (for tram vehicles) away from the internal surface of the wheel rim. The measuring tip is lowered/raised manually.
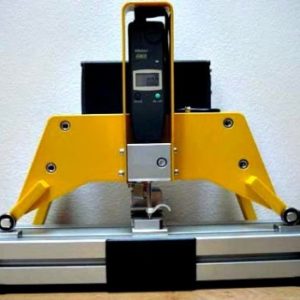
The meter consist of a base plate with the bearing- fitted arms at its ends, making the two end points of the symmetric chord. A MITUTOYO sensor is at the mid point of the chord. Precise meter positioning on the wheel rim inner surface is assured by a triple of arms with their ground, hardened contact points. The bearing chord end points are fitted so that the measuring device could be could slightly be moved along the wheel being measured. A rise amount is then measured in more points to eliminate any local extremes.
The measured/calculated values of the versine/diameter are shown on the LCD display of the MITUTOYO absolute digital sensor. This sensor is supplied in two version: ID-C displayed directly diameter of wheel (SPIDER-r) or ID-U displayed measured versine (SPIDER). Sensor is able to remember the calibration zero setting, even when being turned off and on in the meantime.
A sensor tip is spring-mounted, held in transport position by a turn able stop. The
sensor is fitted so that it could be turned by 180°. Due to this arrangement the wheel can be measured from its inner and outer side. With its sensor turned, the meter must be re-calibrated on a calibrating stand (supplied complete with the meter). The calibration rests in mounting the meter on a calibration stand and zero value recording with the ORIGIN
button.
Alignment measurement range is given by the sensor dynamic range being 0 – 50 mm (ID-C) or 0-25mm (ID-U). Versine measurement preciseness is 0.003 or 0,005 mm. The corresponding wheel diameter calculation preciseness is 0.2 mm. Preciseness of the calibration stand and precise calibration gauges (0.001mm – 0.002 mm) is subject to reviews by the Czech Metrological Institute.
The minimum wheel diameter is dmin = 500 mm . The maximum wheel diameter is dmax = 2250 mm
- 1. MITUTOYO ID-C (SPIDER-r) absolute digital indicator: sized 104,3.3x54x35,2mm, weight 0.16kg, IP 42, dynamic range is 50,0 mm, measurement precision 0.003 mm, carbide measuring tip (M2.5×0.45), tip hold- down force 1,5N, battery SR44, battery life 3,000 hours.
- 2. MITUTOYO ID-U (SPIDER) absolute digital indicator: sized 207.3x38x23mm, weight 0.124kg, IP 42, operational temperature from 0°C to +40°C, storage temperature from -10 C to +60 C. 10oC to +60 oC, dynamic range is mm- 25,4 mm= 1”, measurement precision 0.01 mm, carbide measuring tip (M2.5×0.45), tip hold- down force 1,8N, battery SR44, battery life 20.000 hours.
- 3. Mechanical Section: Base plate, arms with SKF Φ19mm bearings, three arms with ground, hardened contact points, sensor holder with its sensor locks and stops, calibration stand, a stowage case for the meter and its calibrator.

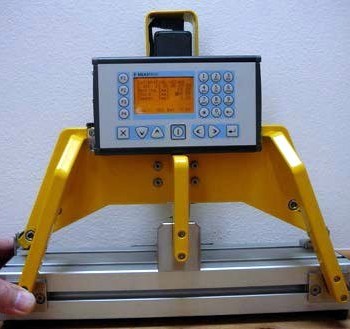
To allow the data collecting, a datalogger is mounted on SPIDER measuring device. Datalogger enables to produce a description of the measured vehicle, collection of up to 400 wheel diameter measurements, including wheel position and measurement date and time. All data are imaged on a backlighted display.
The device is controlled by alphanumeric keyboard. Individual items are chosen using displayed menu and cursor keys. Hotkeys F1 through F4 allow quick access to device calibration, date and time setting, measured vehicle description and wheel diameter measurement.
- Required equipment is an electronic device designed to measure rolling stock wheel diameter
- The device is usable for operational checking of wheel wear or checking the wheel diameter after reprofiling
- The wheel diameter is calculated from the versine measured on three point chord
- This versine is measured by contact way at 70 mm from inner face of wheel rim
- The measuring device is equipped by a baseplate with bearings creating two endpoints of the measuring chord. These bearings will allow movement of the device around the surface of the wheel
- Sensor creates the middle point of the measuring chord
- Precise meter positioning on the wheel rim inner surface is assured by three arms with their hardened contact points
- Versine is then measured in more points to eliminate any local extremes
- The calculated values of the radius in mm are shown on the LCD display of the absolute digital sensor
- Sensor is able to remember the calibration zero setting, even when being turned off and on in the meantime
- A sensor tip is spring-mounted, held in transport position by a turn able stop
- The sensor is fitted so that it could be turned by 180 o. Due to this arrangement the wheel can be measured from its inner and outer side
- The maximum wheel diameter is dmax (10) = 2250 mm
- The minimum wheel diameter is dmin (20) = 550 mm
- Versine measurement precision is ±0.005 mm
- Required wheel diameter precision is ±0.2 mm
- Device is delivered with calibration equipment. Calibration equipment precision is 0.002mm
- battery 1.5V, battery life up to 3000 hours
- operating temperature from 0oC to +40 oC,
- storage temperature from -10oC to +60 oC
- carbide measuring tip
- weight approx. 1.3 kg
- weight of the suitcase with the device and its calibration equipment approx. 3.5 kg
- operating staff: One person
- Spider mounting on a wheel: held down with hand
- main dimensions: (width x height x depth): 350 mm x 250 mm x 150 mm